Discover the Essential Steps to Reseal Your RV Roof Like a Pro
As any seasoned RV owner knows, maintaining your RV's roof is crucial in protecting your mobile haven from leaks and water damage. Regularly inspecting and resealing your RV roof not only extends its life but also ensures you're not caught off guard by unexpected repairs. Whether you're a DIY enthusiast or new to RV maintenance, learning how to reseal an RV roof can save you both time and money. Here’s your step-by-step guide to keeping your RV in tip-top shape.
Materials and Tools You Will Need
Before diving into the resealing process, gather the following materials and tools:
- RV roof sealant: Make sure it's compatible with your roof type. Popular sealant types include Dicor, Eternabond tape, and silicone-based options.
- Bucket and mop: For cleaning the roof surface.
- Rubber gloves: To protect your hands.
- Ladder: Ensure it's stable and safety-approved.
- Putty knife or scraper: For removing old sealant.
- Caulk gun: If your sealant requires one.
- Brush or roller: To apply the sealant smoothly.
Step-by-Step Guide to Reseal Your RV Roof
1. Inspect the Roof
Begin with a thorough inspection. Check for any damage, old sealant, or suspicious spots that might need extra attention. Look for cracks, holes, or soft spots that could indicate water intrusion.
2. Clean the Roof
A clean roof ensures proper adhesion of the new sealant. Use a bucket filled with warm water and a non-abrasive soap to thoroughly wash the roof. Carefully mop away any dirt, debris, and existing loose sealant. Allow the roof to dry completely before applying new materials.
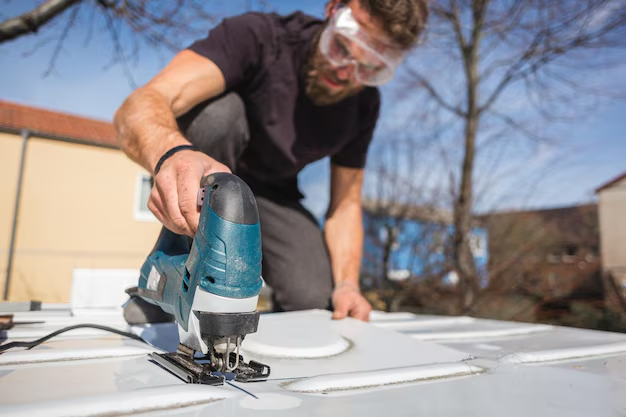
3. Remove the Old Sealant
Use a putty knife or scraper to carefully remove any old or cracked sealant. Be gentle to avoid damaging the roof surface. This step is essential to allow the new sealant to bond effectively.
4. Apply New Sealant
With your caulk gun or roller, apply the new sealant according to the product instructions. Focus on seams, joints, and any areas previously sealed. If you're using a brush, ensure even coverage across all joints. Pay extra attention to edges, fixtures, and areas around vents or skylights.
5. Allow the Sealant to Cure
Allow the sealant sufficient time to dry and cure as per the manufacturer's instructions. This typically requires several hours, so plan accordingly. Avoid exposing the freshly sealed roof to rain or extreme weather until fully set.
Ultimate protection comes not just from a good sealing job but also from regular maintenance. Inspect your roof every six months to ensure it remains in prime condition.
Explore Financial Strategies for a Stress-Free RV Life
Taking care of your RV's roof is a significant investment in extending its life. As you consider your RV's maintenance needs, you might also want to explore financial strategies that can alleviate some stress and ensure your travels remain worry-free. Whether you need assistance with RV-related expenses or general financial relief, these resources may be of interest:
- 🚗 RV Repair Assistance Programs: Some organizations offer financial assistance for RV repairs and maintenance.
- 💳 Credit Card Solutions: Consider cards with rewards like cashback on travel-related expenses to ease your financial burden.
- 📚 Educational Grants and Courses: Invest in online courses to deepen your knowledge of RV maintenance and management.
- 💸 Debt Relief Options: Explore consolidating debts or refinancing to free up funds for future repairs.
- 🏦 Emergency Funds: Establish or bolster your emergency fund to cushion unexpected RV costs.
Regular maintenance, savvy financial planning, and knowing where to find help when needed are keys to enjoying a seamless and enjoyable RV lifestyle. Embrace these practices, and your RV adventures will continue to unfold with ease and confidence.