Building Your Own Roof: A Handy Guide to Getting Started
Constructing a roof might seem daunting, but with the right guidance, it can transform into a rewarding project. Understanding the core principles of roof building not only equips you with a useful skill but also increases the value of your property. Before diving into this hands-on process, it’s essential to comprehend the basics and develop a solid plan.
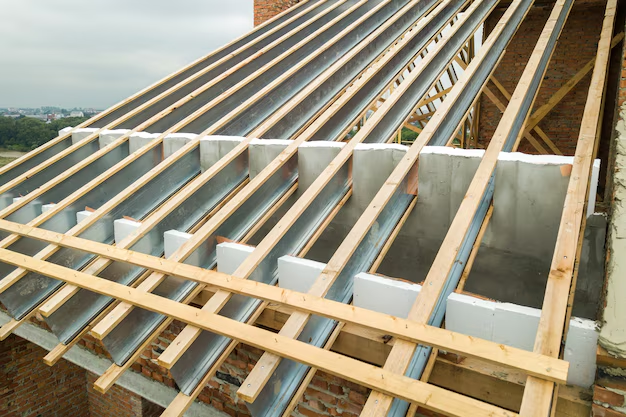
Understanding Roof Anatomy
Before picking up a hammer, familiarize yourself with key components of a roof. These include:
- Trusses or roof frames, the main structural support.
- Sheathing, which are boards or sheet materials fixed to the trusses.
- Roofing material, such as shingles or tiles, providing the outer protective layer.
Gathering Your Tools and Materials
To build a roof effectively, gathering the right tools and materials is crucial. Here's a checklist of essentials:
- Hammer and nails
- Measuring tools for accuracy
- Safety gear (gloves, helmet, harness)
- Ladder or scaffolding
For materials, consider options that fit your climate and budget. Asphalt shingles are popular for their durability and cost-effectiveness, while metal roofing offers longevity in harsher weather.
Steps to Building Your Roof
Step 1: Planning and Design
Begin by designing your roof. Consider factors like roof pitch, which affects water drainage, and local building codes. It's wise to consult with a professional to ensure structural integrity.
Step 2: Building Trusses
Assemble the trusses according to your design. Use measured cuts of lumber and secure them with metal connectors. Accuracy is key, as any misalignment impacts the entire build.
Step 3: Install Sheathing
Once trusses are secured, apply the sheathing. Lay the boards across the trusses, starting from the bottom. Ensure there are no gaps, as sheathing provides the base for the roofing material.
Step 4: Waterproofing and Insulation
Apply a waterproof underlayment to shield your home from leaks. This step is crucial, especially in areas prone to heavy rain or snow.
Step 5: Laying the Roofing Material
Install your chosen roofing material according to manufacturer instructions. If using shingles, start from the bottom and work upwards, overlapping as you go.
Exploring financial and educational resources
Building a roof is an investment that can often stretch your budget. However, various financial assistance programs and incentives can ease this burden. Understanding options such as home improvement loans or tax rebates for energy-efficient roofing can empower you to optimize your financial resources.
Moreover, those leaning toward self-construction could explore educational grants or programs offering training in construction skills. By enhancing your knowledge, you not only save costs but also invest in your personal growth.
Closing the project with a solid roof over your head brings immense satisfaction, but also responsibilities. As you enjoy your new canopy, consider exploring further assistance options that help maintain the structure or enhance your financial situation.
Financial and Educational Assistance Options:
- 💰 HUD Home Improvement Loans: For low-interest financial assistance.
- 🏠 Energy-Efficient Roofing Tax Credits: Reduces upfront costs for materials.
- 💳 0% APR Credit Cards: For financing large purchases without immediate interest.
- 📚 Construction Skill Training Grants: Enhance your DIY capabilities.
- 👷♂️ Local Government Aid Programs: Check for region-specific help.
- 🌿 Sustainable Building Incentives: When opting for eco-friendly materials.
Building a roof shouldn't just be about nails and shingles; it's about creating security and empowerment both financially and educationally. As you hammer the last shingle in place, remember that these resources are there to support every step of your journey.