Can You Really Replace Your Home Windows Yourself? A Practical Guide
Staring at drafty, fogged, or outdated windows and wondering, “Can I just replace these myself?” is a common moment for many homeowners. New windows can improve comfort, cut energy loss, and refresh your home’s appearance—but window replacement is also one of the more complex home projects you can take on.
This guide walks through what window replacement actually involves, where DIY makes sense, where it often doesn’t, and how to decide what’s right for your home, skills, and budget.
Understanding What “Replacing Windows” Actually Means
Before deciding whether you can replace windows yourself, it helps to be clear on what type of replacement you’re considering.
Full-Frame vs. Insert (Retrofit) Replacement
There are two main approaches:
1. Full-frame window replacement
This involves removing:
- The old window sash
- The frame
- Exterior trim or siding around the opening (in many cases)
- Interior trim (often)
Then installing:
- A new, complete window unit with its own frame
- New flashing and insulation
- New interior and possibly exterior trim
What it means for DIY:
Full-frame replacement is more complex. It affects the wall opening, weatherproofing, and sometimes siding. For many homeowners, this is at the upper end of what’s practical to handle without experience.
2. Insert (pocket) window replacement
An insert window is installed inside the existing frame. You remove:
- The old sash
- Some hardware or stops
But you leave:
- The original frame
- Generally, the exterior siding and interior trim intact
The new unit is sized to fit into that existing frame.
What it means for DIY:
Insert replacements are usually more approachable for handy homeowners, especially when the existing frame is square, solid, and not water damaged.
When Is a Window Repair Instead of Replacement Enough?
Some window issues can sometimes be addressed with repair rather than full replacement, such as:
- Broken glass in an otherwise solid window
- Sticking sashes that need hardware adjustments or lubrication
- Minor drafts that can be improved with new weatherstripping or caulk
If the frame is:
- Rotten, warped, or soft to the touch
- Out of square, causing large gaps
- Leaking water regularly
…that usually points toward replacement, not just repair.
Is DIY Window Replacement Right for You?
Replacing windows is not all-or-nothing. Some homeowners tackle a few windows themselves and leave harder ones (like big picture windows or second-story installations) to professionals. To decide what fits you, it helps to look at a few core factors.
1. Skill Level and Experience
DIY window replacement tends to go better if you:
- Have done other carpentry or remodeling projects (framing, trim work, siding, or door installation).
- Are comfortable using tools like a circular saw, drill, level, pry bar, and caulking gun.
- Can confidently read a tape measure to the fraction of an inch and understand what “out of square” looks like.
Those newer to tools sometimes still succeed on one simple insert window as a learning project, but taking on an entire house without experience can be overwhelming.
2. Types of Windows and Locations
Some windows are more DIY-friendly than others.
Generally easier for DIY:
- Standard-sized insert replacements
- Single-story windows accessible from the ground
- Rectangular windows with no curves or unusual shapes
- Windows in siding that’s easy to remove and patch (like some wood or vinyl)
More challenging for DIY:
- Large picture windows or multi-unit assemblies
- Second-story windows requiring tall ladders or scaffolding
- Bay and bow windows that project out from the wall
- Windows near roof lines, decks, or complex trim
- Historic homes where openings may be irregular
The more complicated the access and shape, the more likely professional help becomes preferable.
3. Time, Tools, and Help
Even a “simple” DIY window project has many steps. Homeowners often find that:
- The first window takes the longest as you figure out the process.
- Later windows go faster as you get comfortable.
You’ll typically need:
- Basic carpentry tools: tape measure, level, hammer, drill/driver, pry bar, utility knife
- Caulking and sealing tools: caulk gun, high-quality exterior sealant
- Safety equipment: gloves, safety glasses, sometimes a respirator or dust mask
- If working above the first floor: appropriate ladders or staging
Having at least one other person to help lift and hold windows in place makes the process safer and more accurate.
The Pros and Cons of DIY Window Replacement
Understanding the trade-offs of do-it-yourself window replacement versus hiring a professional helps clarify your choice.
Potential Advantages of DIY Window Replacement
✅ Cost control (labor savings)
Homeowners often consider DIY primarily to avoid professional labor costs. Removing and installing the windows yourself typically reduces the project’s out-of-pocket expenses to materials and tools.
✅ Full schedule control
You can work on weekends, in stages (room by room), and at your own pace.
✅ Learning and satisfaction
Many people enjoy the sense of accomplishment that comes from successfully installing windows themselves. It can also build skills for future home projects.
✅ Customization of details
You make decisions about insulation methods, trim style, and caulking exactly how you want them, within manufacturer guidelines.
Potential Drawbacks and Risks of DIY
❌ Risk of leaks and drafts
Incorrect installation can lead to water intrusion, moisture buildup, and air leaks. These issues may not be obvious immediately and can cause damage over time.
❌ Possible warranty limitations
Some manufacturers tie extended warranties or certain coverage details to professional installation or adherence to specific guidelines. If warranty terms matter, it’s important to read them carefully ahead of time.
❌ Structural and safety issues
Improperly installed windows may:
- Not function smoothly
- Be difficult to lock
- Place stress on the frame or glass
In extreme cases, this can affect security or long-term durability.
❌ Longer project timeline
For an experienced installer, a houseful of windows may be a routine job. For a homeowner doing this the first time, the same job can stretch into many weekends.
DIY vs. Professional Installation at a Glance
| Aspect | DIY Window Replacement | Professional Window Installation |
|---|---|---|
| Labor cost | 💲 Lower (you supply the labor) | 💲💲 Higher (you pay for expertise and time) |
| Skill required | Moderate to high | Minimal for you as the homeowner |
| Time commitment | High, especially first-time | Lower personal time commitment |
| Risk of mistakes | Higher without experience | Lower, especially with seasoned installers |
| Warranty considerations | May be limited or require proof of proper install | Often includes labor warranty alongside manufacturer’s |
| Convenience | Lower (you coordinate everything) | Higher (turnkey process) |
| Flexibility in timing | High (you choose schedule) | Moderate (based on contractor availability) |
What’s Involved in Replacing Windows Yourself?
If you’re leaning toward DIY, knowing the typical steps can help you judge whether it feels manageable.
Step 1: Assess and Measure Existing Windows
Accurate measurement is crucial. Insert replacement windows are ordered to fit the existing opening, not the original rough opening in the wall.
Typical measuring steps include:
- Measuring width in three places: top, middle, bottom—use the smallest number.
- Measuring height in three places: left, center, right—again, use the smallest.
- Checking diagonals from corner to corner to see if the frame is square (similar diagonal measurements suggest squareness).
- Inspecting the existing frame for rot, warping, or water damage.
If the frame is damaged or significantly out of square, an insert window may not seal properly, and a full-frame replacement or repair of the opening may be necessary.
Step 2: Choose Your Replacement Window Type
There are multiple window types and materials, including:
- Double-hung, single-hung, casement, sliding, awning, fixed, and more
- Frame materials such as vinyl, wood, fiberglass, or composite
Consider:
- How important energy efficiency is for your climate
- The style of your home and existing windows
- How much maintenance you’re willing to handle (wood typically requires more upkeep than many other materials)
While brand specifics are outside the scope here, most window manufacturers provide installation instructions unique to their products. Reviewing those guidelines in advance can give you a clear picture of the complexity involved.
Step 3: Prepare the Work Area
Preparation helps reduce frustration mid-project.
You’ll usually want to:
- Clear furniture, curtains, blinds, and anything blocking access.
- Lay down drop cloths to catch debris and protect floors.
- If working on an upper level, plan safe ladder or platform placement outside.
Removing interior trim is sometimes necessary, even for insert windows, depending on how your existing windows were built and finished.
Step 4: Remove the Old Window
The removal process typically includes:
- Removing the sash (the movable part of the window).
- Cutting or prying out stops or parting beads that hold the sash in place.
- Carefully detaching or cutting free any old caulk, nails, or screws securing the frame.
- Lifting the old frame out of the opening (for full-frame replacements).
Care is especially important around:
- Exterior cladding (siding, brick, stucco) to avoid unnecessary damage.
- Interior wall finishes such as drywall or plaster.
Step 5: Inspect and Prepare the Opening
Once the old unit is out, the opening should be checked for:
- Rot or softness in the framing wood
- Evidence of prior water leaks
- Gaps or uneven surfaces
Typical preparation steps may involve:
- Repairing or reinforcing framing where needed.
- Cleaning debris and old sealants that could prevent the new window from sitting flush.
- Installing or repairing flashing to help divert water away from the opening (for full-frame work).
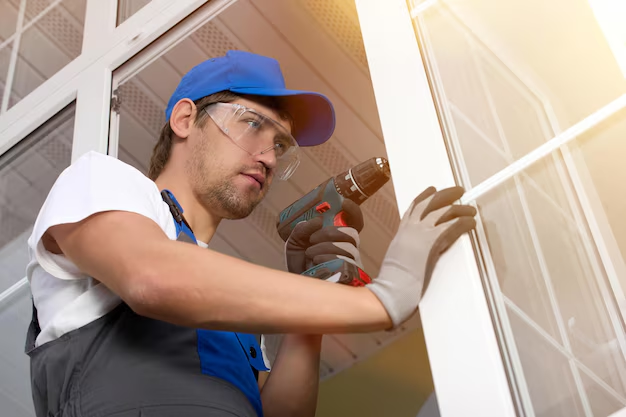
Step 6: Install the New Window
Although every manufacturer’s procedure is slightly different, common steps for setting an insert window may include:
- Dry-fitting the window in the opening to confirm size and fit.
- Applying sealant to the sill or following any specific preparation steps in the instructions.
- Setting the window into place from the inside or outside, depending on the design.
- Shimming the sides and sometimes top or bottom of the window to:
- Make it level and plumb
- Ensure the frame is not twisted or bowed
- Fastening the window through pre-drilled holes or specified locations.
Throughout this process, it’s common to:
- Check operation: open, close, and lock the window to ensure smooth movement.
- Re-check level, plumb, and square before fully tightening fasteners.
Step 7: Insulate and Seal Around the Window
Proper sealing is essential to prevent air and water intrusion.
This step often includes:
- Placing insulation between the window frame and the rough opening (often low-expansion foam designed for windows and doors or loosely placed fiberglass insulation).
- Applying exterior sealant around the outside where the frame meets siding or trim, as directed in the installation guide.
- Reinstalling or replacing interior trim.
Attention to detail here helps prevent drafts, condensation problems, and future water damage.
Step 8: Finish Work and Clean-Up
After the window is in place:
- Clean glass and frame surfaces.
- Touch up or repaint interior trim if necessary.
- Reinstall hardware and accessories like blinds, curtain rods, and screens.
For multi-window projects, many homeowners find it helpful to:
- Fully complete one window as a “prototype”
- Then repeat the process with refinements on the rest
Common DIY Mistakes to Watch For
Learning from frequent challenges can help you avoid them.
1. Incorrect Measurements
Ordering windows that are too large or too small is one of the most frustrating and costly mistakes. It can result in:
- Gaps too large to insulate effectively
- Windows that simply don’t fit the opening
Tip:
Measure more than once, in multiple locations, and record carefully. Many homeowners write measurements directly on painter’s tape stuck to the existing window to avoid confusion.
2. Neglecting Level and Square
Even a window that technically “fits” can operate poorly if it isn’t:
- Level at the sill
- Plumb at the sides
- Square overall
Issues include:
- Sashes that don’t latch properly
- Windows that are hard to open or that slide on their own
- Uneven gaps and poor sealing
Using a reliable level and checking diagonal measurements helps prevent this.
3. Inadequate Sealing or Insulation
Under- or over-filling gaps around the frame can cause:
- Drafts and energy loss
- Difficulty operating the window if foam expands too much and presses on the frame
- Moisture entry and eventual rot
Manufacturers usually specify suitable products and application methods, especially for spray foam.
4. Skipping Safety Precautions
Window glass and frames can be heavy and awkward to handle. Common oversights include:
- Working without proper eye protection during demolition.
- Underestimating the risk of handling large windows on ladders or near open edges.
- Attempting solo lifts of heavy units that are better handled by two people.
Thoughtful planning and appropriate equipment reduce the risk of accidents.
When Many Homeowners Choose Professional Installation
Even capable DIYers sometimes decide to bring in professionals for certain situations.
Complex Openings or Structures
Professional installers are often called in for:
- Bay or bow windows
- Non-standard shapes or custom designs
- Large multi-window units that span wide sections of wall
These units interact more heavily with the structural frame of the house and sometimes with roofing elements.
Significant Water Damage or Rot
If removal of the old windows reveals:
- Widespread rot in framing members
- Signs of long-term leaks
- Damage to sheathing or structural elements
…resolving those issues may involve work deeper into the wall than a typical window swap. Many homeowners prefer experienced help in those situations.
Second-Story and Hard-to-Reach Windows
Working at height introduces added risk. Climbing with heavy glass or leaning out from ladders is inherently more dangerous than ground-floor work. Professional installers generally have:
- Experience with safe ladder use
- Access to scaffolding or lifts when needed
Tight Timelines
If your goal is to have multiple windows replaced efficiently within a short window of time, a professional crew often moves significantly faster than a one- or two-person DIY effort.
Practical Tips If You Decide to DIY
For homeowners who want to attempt at least part of the project themselves, a few strategies can help things go more smoothly.
🌟 Helpful DIY Window Replacement Tips
Start small:
Begin with one relatively accessible, standard-size window. Treat it as a learning project before committing to the entire house.Read instructions thoroughly:
Window manufacturers typically provide printed or online installation guides. Reviewing these in advance can reveal any special techniques or tools required.Check local building requirements:
Some areas require permits for window replacement, especially when altering size, style, or emergency egress in bedrooms.Work in good weather:
Dry, mild conditions make sealing, caulking, and exterior work much more manageable.Plan for temporary coverage:
If something takes longer than expected, having plastic sheeting or a temporary panel to close an opening overnight can be valuable.Keep safety first:
Use appropriate protective equipment, especially when handling glass or working at heights.
Key Questions to Ask Yourself Before Deciding
A short self-check can bring your best option into focus:
How many windows are you replacing?
One or two windows may feel achievable as a DIY project; a whole house is a much bigger commitment.Are the existing frames in good condition?
Solid, square frames are friendlier for insert replacements, while damaged ones can complicate DIY work substantially.Do you have previous experience with similar projects?
Experience with doors, trim, or other carpentry tasks can make window installation more intuitive.How comfortable are you working on ladders or near edges?
If many windows are on upper stories, comfort with heights becomes a serious factor.How important is long-term warranty coverage to you?
If extended warranties and clear documentation are a priority, it may be worth reviewing how DIY installation affects that.
Quick Overview: DIY Window Replacement Readiness Checklist
Here’s a concise, skimmable summary you can use as a reality check:
| ✅ / ⚠️ | Question | What It Suggests |
|---|---|---|
| ✅ | Are most windows on the first floor and easy to reach? | More DIY-friendly |
| ✅ | Are existing frames solid, not rotten, and roughly square? | Insert replacements likely feasible |
| ✅ | Do you own or can you borrow basic carpentry tools and a sturdy ladder? | Practical to attempt DIY |
| ⚠️ | Are you uncomfortable working with glass or at heights? | Certain windows may be better left to professionals |
| ⚠️ | Are your openings irregular, very old, or show signs of water damage? | Professional assessment may be helpful |
| ⚠️ | Do you need many windows replaced in a short period of time? | Professional crews can significantly shorten the project timeline |
Bringing It All Together
Replacing home windows yourself is possible for many homeowners—especially when dealing with straightforward, first-floor insert replacements and when you have some basic carpentry experience. It can reduce labor costs and offer a sense of accomplishment, while giving you hands-on control over an important part of your home.
At the same time, window installation is not a simple “pop it in and you’re done” task. It involves:
- Accurate measuring
- Careful handling
- Attention to weatherproofing
- Safety awareness at every step
For complex openings, significant damage, or second-story work, many homeowners opt for professional installation to reduce risk, protect long-term performance, and streamline the process.
Ultimately, the question isn’t only “Can I replace my windows myself?” but also “Which windows make sense to DIY, which don’t, and what level of time and responsibility am I comfortable taking on?” By weighing your skills, the condition of your current windows, your tools, and your schedule, you can choose the path that keeps your home well-protected, comfortable, and aligned with your long-term goals.